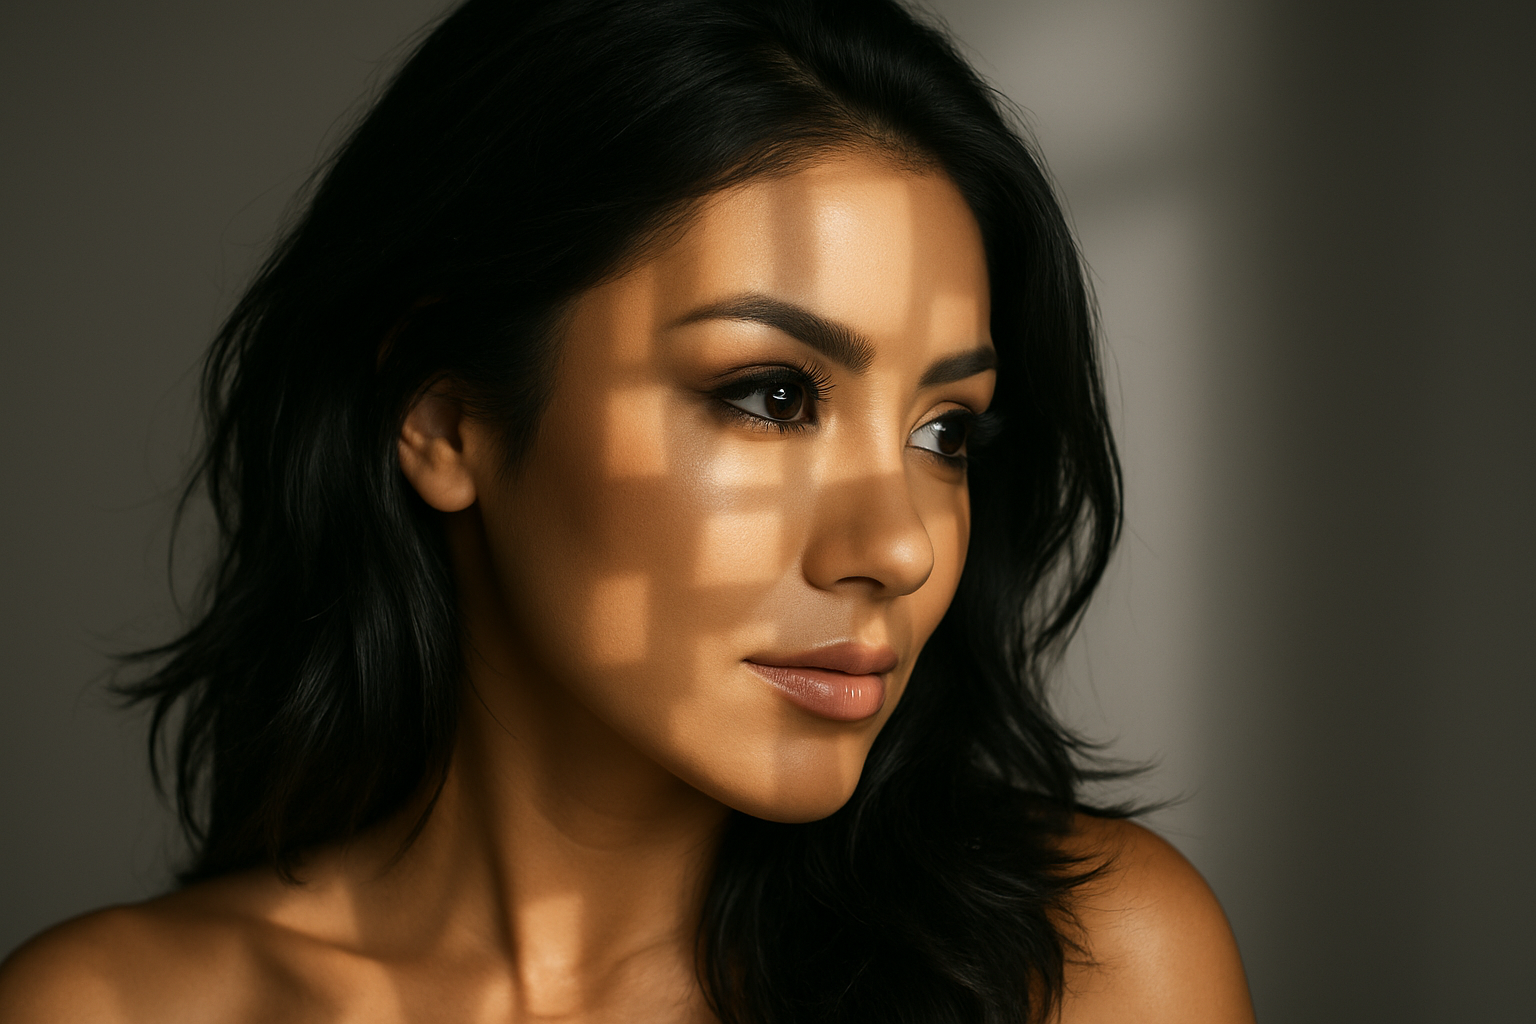
Transform Your Interior Photos with Window Lighting Magic
Ah, window light—the ultimate aesthetic savior for photographers and digital artists alike. Imagine capturing the subtle dance of light and shadow, all without needing to relocate to a chic rooftop loft with floor-to-ceiling windows. Thanks to the wonders of Photoshop and a pinch of digital artistry, you can elevate your interior photos to cinematic masterpieces. Want to know the trick? It involves adding artificial window light and shadows. We know it sounds labyrinthine, but let’s demystify this digital sorcery.
Setting the Scene: The Tools and Prep
To start, you’ll need a photo that you’re dying to transform. Our resident Photoshop wizard has provided an example photo along with a black and white image of geometric shapes, which somehow—through the alchemy of digital art—form your theatrical window light. And remember, while Marty might have his preferred visuals, you’re free to get creative with whatever shapes scream “drama” to you.
Once you have these—control/command A to select, control/command C to copy—you’re ready to paste them onto your subject using good old control/command V.
Crafting Custom Brushes
Your next move is to create a custom brush from these shapes. Head over to Edit and feast your eyes on Define Brush Preset. When the brush name window pops up, don’t overthink it. Simply click OK or hit enter. You’ve now made your shapes into a custom brush! Feel free to delete the now-unneeded layer. (Wave it goodbye as you drag it to the trash, or hit delete if you’re in a minimalist mood.)
Mastering Light and Shadow with Adjustment Layers
Once your custom brush is ready to roll, it’s time to manipulate the atmosphere with precision. Click on the adjustment layer icon and select Exposure. By typing in minus 3, you introduce a brooding tone—but adjust according to your photo’s unique personality.
With your brush tool, center your cursor over your image and click. Presto! You’ll notice the original photo peeking through, courtesy of the black shapes concealing that over-the-top exposure adjustment. Need a mnemonic for layer masks? Just think: white reveals, black conceals.
Getting Dynamic with Transform Tools
Duplicating your adjustment layer (a quick control/command J) lets you explore new dimensions—literally. Angle and position your shapes to channel that window illumination exactly where you want it by using the Transform tool. By strategically dragging and rotating, you’ll guide light like a seasoned cinematographer.
Feathering the bottom layer mask around 10 pixels gives a subtle blend, like smudging eyeliner for that effortlessly smoldering look.
Making a subject copy lets you nestle it between two adjustment layers, ready for deft selections using the Quick Selection Tool. Photoshop’s AI lends a helping hand to capture subjects with greater precision.
Refining Your Illumination Masterpiece
It’s not just about casting pretty window shapes. You’ll want these shadows to play harmoniously with your subject’s curves. Use your Brush Tool and brush picker to choose a soft, round brush with zero hardness for a seamless effect.
By adjusting opacity, feathering, and going freestyle with brush sizes and colors (white for foreground, black for background), you’re in full control of how light graces your composition.
Finally, feather and offset both the background and the window light, so it kisses the edges of your subject perfectly. Feel free to play with shadow shapes and tweak their anatomical fit using your brush.
Apply and Admire
Switch your final brush adjustments to nourish your photo’s inherent contrast. Apply multiply blending mode, and fine-tune opacity until it whispers rather than shouts — at around 70%, the ambiance feels just right.
Now you’ve successfully transformed an image with realistic window light and shadows, offering you a whole array of new creative possibilities. Who needs natural sunlight when you have Photoshop’s toolkit at your disposal?
Let life’s dramas play out through your crafted tendrils of light and shade, and transform any scene into a moment of cinematic marvel—digitally, retroactively, and entirely free of over-priced loft real estate.
So go forth, fearless photo editor, and wield your newfound powers with flair. Happy Photoshopping!


