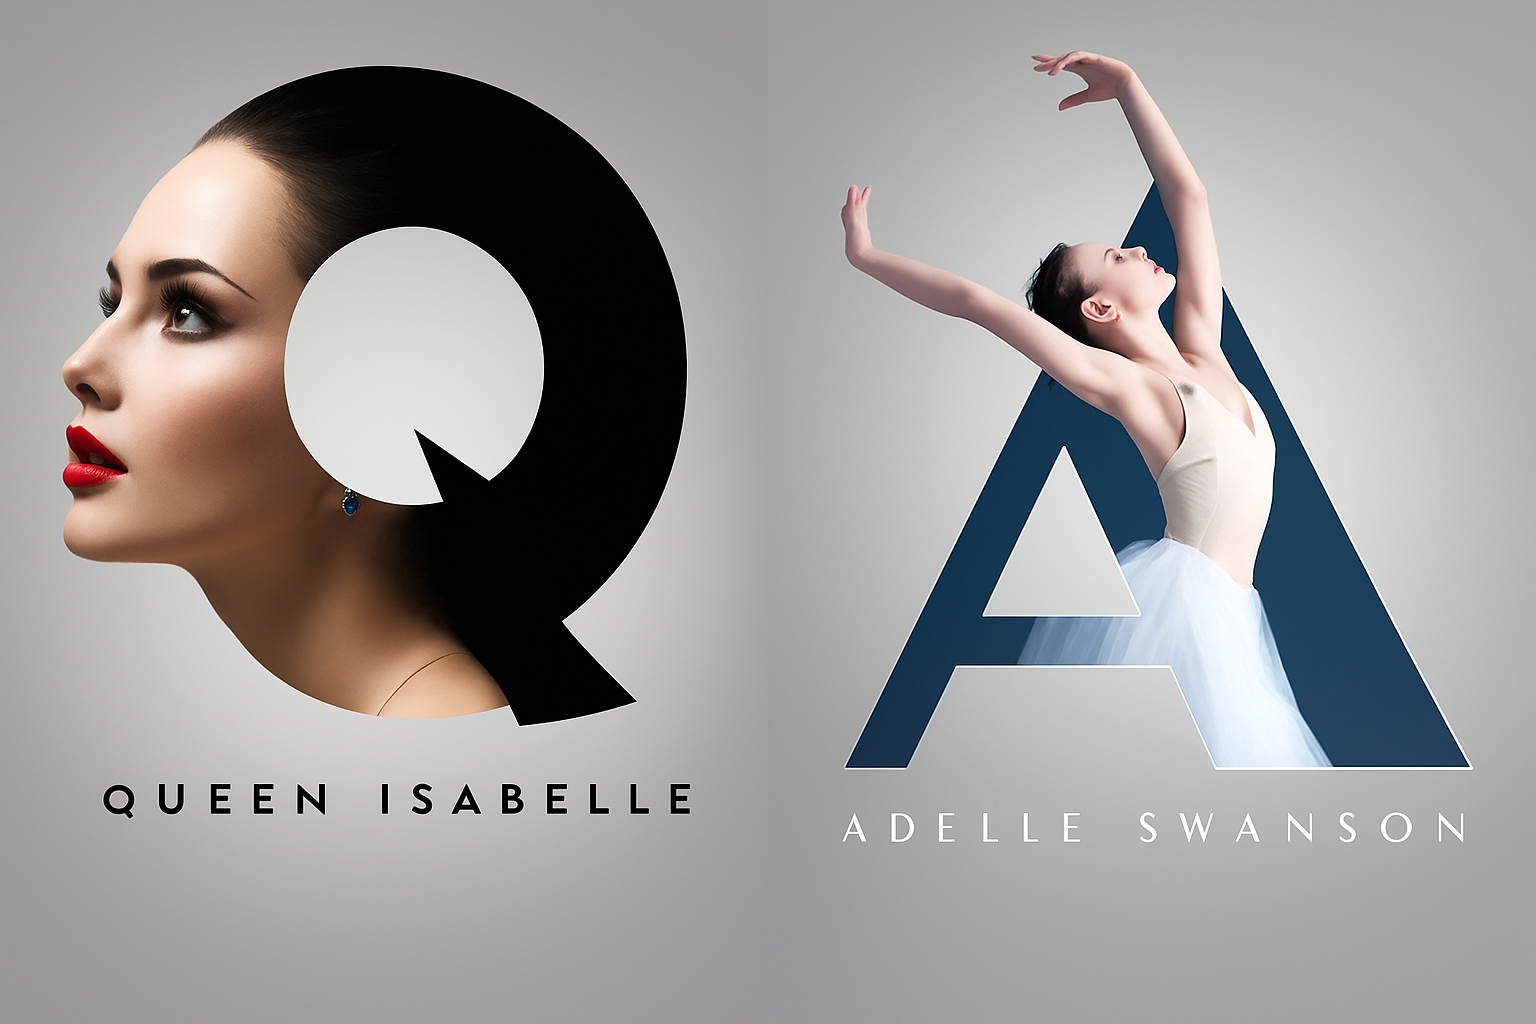
Transform Your Portraits with a Creative Type Design
Have you ever looked at a portrait and thought it could use a little more pizzazz? Feeling a creative itch to integrate typography with striking visuals? Well, look no further. We’re diving into a nifty Photoshop tutorial that will help you create a stunning letter portrait design effect. This isn’t just another tutorial—it’s a chance to blend photography with type in a way that lets your creative juices flow freely. Say goodbye to mundane portraits and hello to typographical masterpieces!
Setting the Stage: Prepare Your Document
First things first—grab a photo of your favorite subject. Whether it’s a family snapshot or a stellar shot from Shutterstock, make sure it speaks to you. Open up Photoshop and kick things off by creating a new document. The recommended dimensions are 1000 x 1000 pixels with a resolution of 150 dpi, but feel free to tweak these numbers as per your artistic whim.
Don’t forget background colors! If it’s not white, change it in your document settings. A soft, radial gradient is waiting to be smeared onto this blank canvas which will act as a subtle stage for our typographical performance.
Typography Meets Photography
Here’s where it gets juicy. Pick a letter, any letter! It’s showtime for that monstrous “T” or the elegant “A”. Utilize the Horizontal Type Tool, and set your font preferences. For those who love a classic touch, “Elephant Regular” is a wise choice. Many fonts are available across the web, so do a quick search online and find one that suits your aesthetic.
Adjust the size—say around 454 points—and center that bad boy right in your document. For those of you hunting for subtle design tips, numeric alignment and stroke options await in the Layer Styles menu. It’s not just about the letter; it’s about how you dress it!
Layering Your Portrait Magic
With your letter standing tall, it’s time to introduce the main character: the portrait. Use the Quick Selection Tool in Photoshop to expertly cut out your subject from the background—a process now made even swifter thanks to the “Select Subject” button provided in the latest Creative Cloud versions.
With your portrait isolated, it’s now time to slot the layer right on top of that towering letter. Tweak transparencies and play with transformations until your subject’s features frame the type in an aesthetically pleasing arrangement. Remember, Opacity is your best friend!
Pencil in Personality
With your new visual marvel taking shape, it’s time to personalize your composition. Deploy the trusty Pencil Tool, position it like Michelangelo and sketch out those portions of the image you wish to bring to the fore. Your composition should now boast a seamless blend of personality and style.
Sign Off with Style
Let’s seal the deal with some textual finesse. Add the subject’s name or a catchy phrase underneath the letter portrait. Your Type Tool is ready to rock, and you can change up font sizes or colors directly from Photoshop’s toolbar. It’s all about complementing the artwork above, so select colors that mesh well with your main subject.
Finally, bring that original stroke if it was hidden back into view for a bold silhouette. It frames the composition, ensuring each layer stands out yet works harmoniously with the rest. Voilà—a typographic marvel that commands attention!
Join The Typo-graphical Revolution
Transforming a humdrum portrait into a masterpiece isn’t solely about what you follow in tutorials, but also about the creative choices you make along the way. Let your imagination run wild with the countless options available within Photoshop’s toolbox. Whether you’re looking to jazz up a single image or reinvent your entire collection, this tutorial is your gateway to visual innovation. Happy Photoshopping!
By mixing fonts like Elephant Regular and cutting-edge photo techniques, the art of digital design finds a new, exciting frontier. Will you join the revolution or let the wave pass you by?


