Unveiling the Mysteries of Photoshop to Create a Moonlit Sky
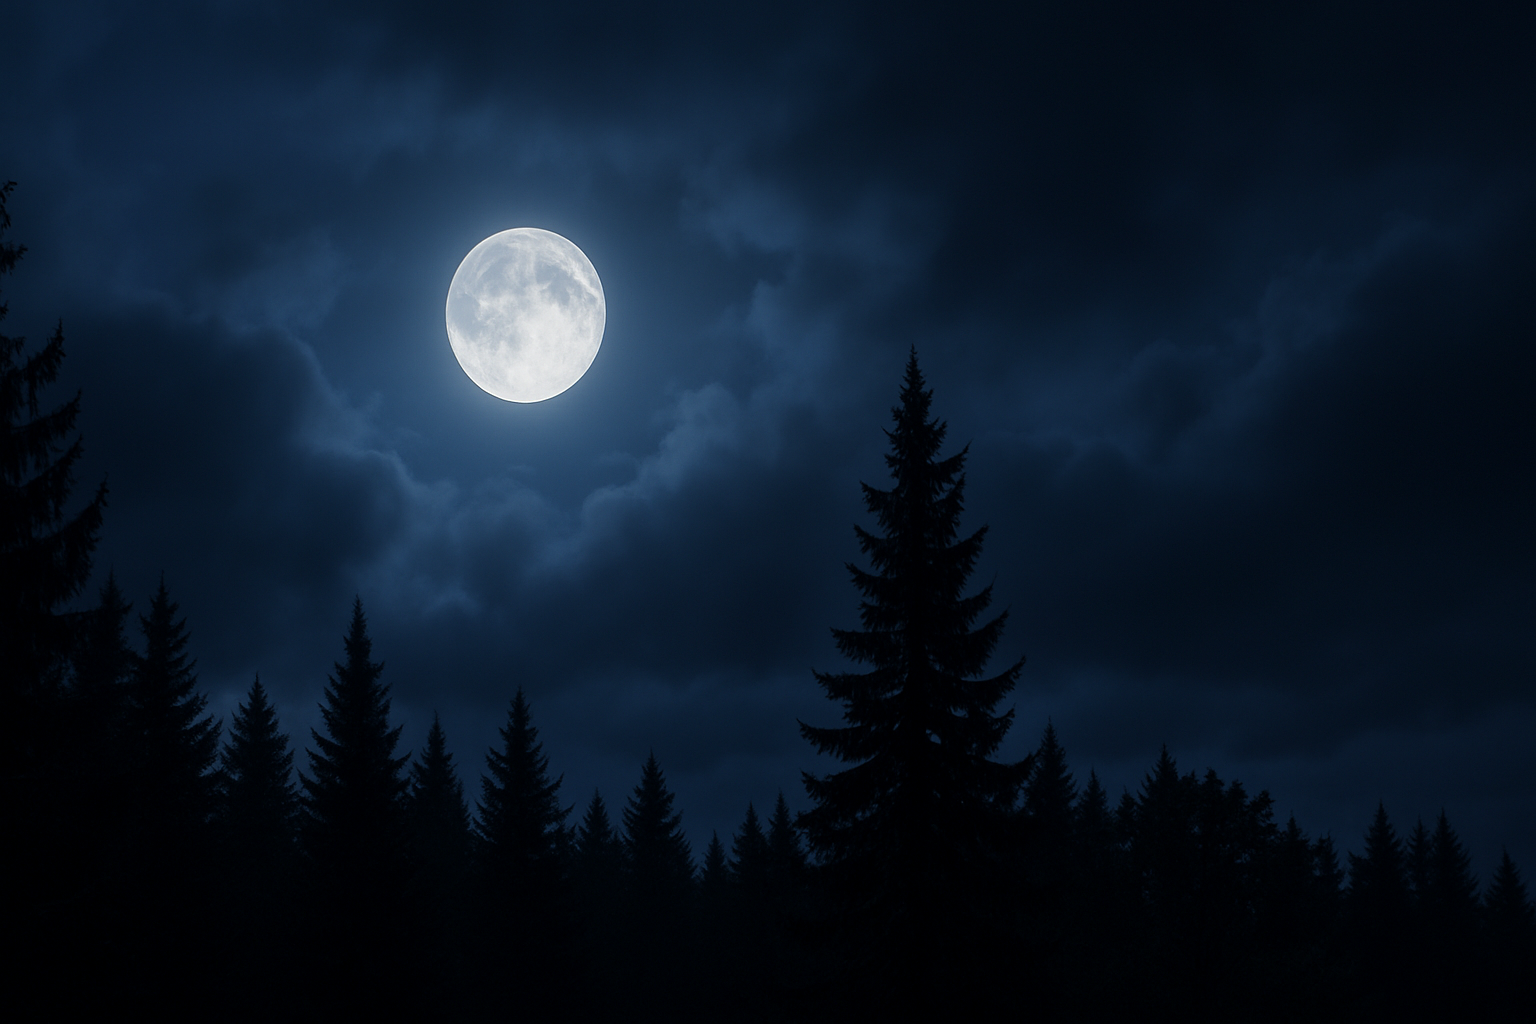
Picture this: a serene, moon-bathed evening with clouds calmly drifting alongside the glowing moon. It’s a cinematic scene straight out of a fantasy, yet here’s the kicker—you can materialize this enchanting atmosphere from a mundane cloudy daytime photo. With Photoshop and a sprinkle of creativity, let’s dive into transforming an average image into a stunning visual masterpiece.
Photoshop Color Lookups: Your New Best Friend
Before getting into the granular details, we should introduce Photoshop’s color lookups—a nifty tool for changing the mood and tone of an image with a few clicks. Using them, we can simulate the eeriness and beauty of a moonlit sky. Here’s a step-by-step recipe to conjure those mystical lunar vibes.
Step 1: Preparing Your Canvas
Start by opening your cloudy daylight image in Photoshop. Ensure your image dimensions are set to 1920×1080 pixels at a resolution of 150 pixels per inch, just like setting up your canvas before painting your masterpiece.
- Accessing Color Lookups:
- Navigate to
Image > Adjustments > Color Lookup. - Choose the
Moonlight3D LUT file from the menu. - Voilà! Your canvas is now tinted with a moonlit ambience.
- Navigate to
Step 2: Adding Your Celestial Companion
Now, amid the serenity, we can’t afford to miss the star of the show—the Moon itself! If you don’t have a moon image ready at hand, the video description provides one just for you. Load it up and let’s proceed.
- Positioning the Moon:
- Click anywhere on the moon image and drag it onto your sky tab.
- Fine-tune its size using
Control/Command + T, adjust with a mix ofShiftandALT/Optionas you resize, then anchor it when you’re pleased with the placement.
Step 3: Creating Moon’s Halo
To heighten the moon’s allure, a halo or corona of light often amplifies its ethereal glow.
- Creating a Halo:
- Duplicate the moon layer and name it “Circle.”
- Fill a circular selection beneath your moon with white by pressing
Control/Command + Delete.
Next, add an outer glow:
- Outer Glow Settings:
- Set the color to white, blend mode to normal, and an opacity of 87%.
- Adjust size relative to your photo’s resolution—117 pixels works as a general starting point.
Step 4: Melding Clouds with Lunar Majesty
In a moody sky, clouds should partially veil the moon, unveiling the night’s mysteries.
- Layer Mask Magic:
- Group the moon and its circle layer (
Control/Command + G) and apply a layer mask. - Using a brush (200 point, 65% opacity), gently paint atop the moon to expose the dark clouds swathing around it.
- Group the moon and its circle layer (
This step intertwines the moon with the heavy clouds seamlessly, invoking nature’s chiaroscuro.
Step 5: Make the Corona Subtle Yet Spectacular
A subtle corona—a soft luminous circle around the moon—adds to its quiet radiance.
- Curating the Corona:
- Select the elliptical marquee to draw a circle from the moon’s center.
- Go to
Edit > Stroke, choose 20 pixels, and remove the selection afterward.
Open a new layer, apply Select > Modify > Feather by 20 pixels, and fill it with white. Switch the blend mode to Overlay and set the opacity to 20%.
Resize with Control/Command + T as before to make the corona blend harmoniously.
Conclusion: Paint the Night with Your Own Lunar Touch
At the end of this enchanting Photoshop journey, your once run-of-the-mill cloudy photograph is transformed into a mesmerizing dreamscape, where the moon serenely diffuses its silvery light across a brooding sky. Play around with these techniques to add your personal touch, and you’ll master the art of night photography, without ever staying up past midnight. Isn’t it just poetic what a little digital magic can unveil? Now, go on, let the midnight muse inspire your next masterpiece!


