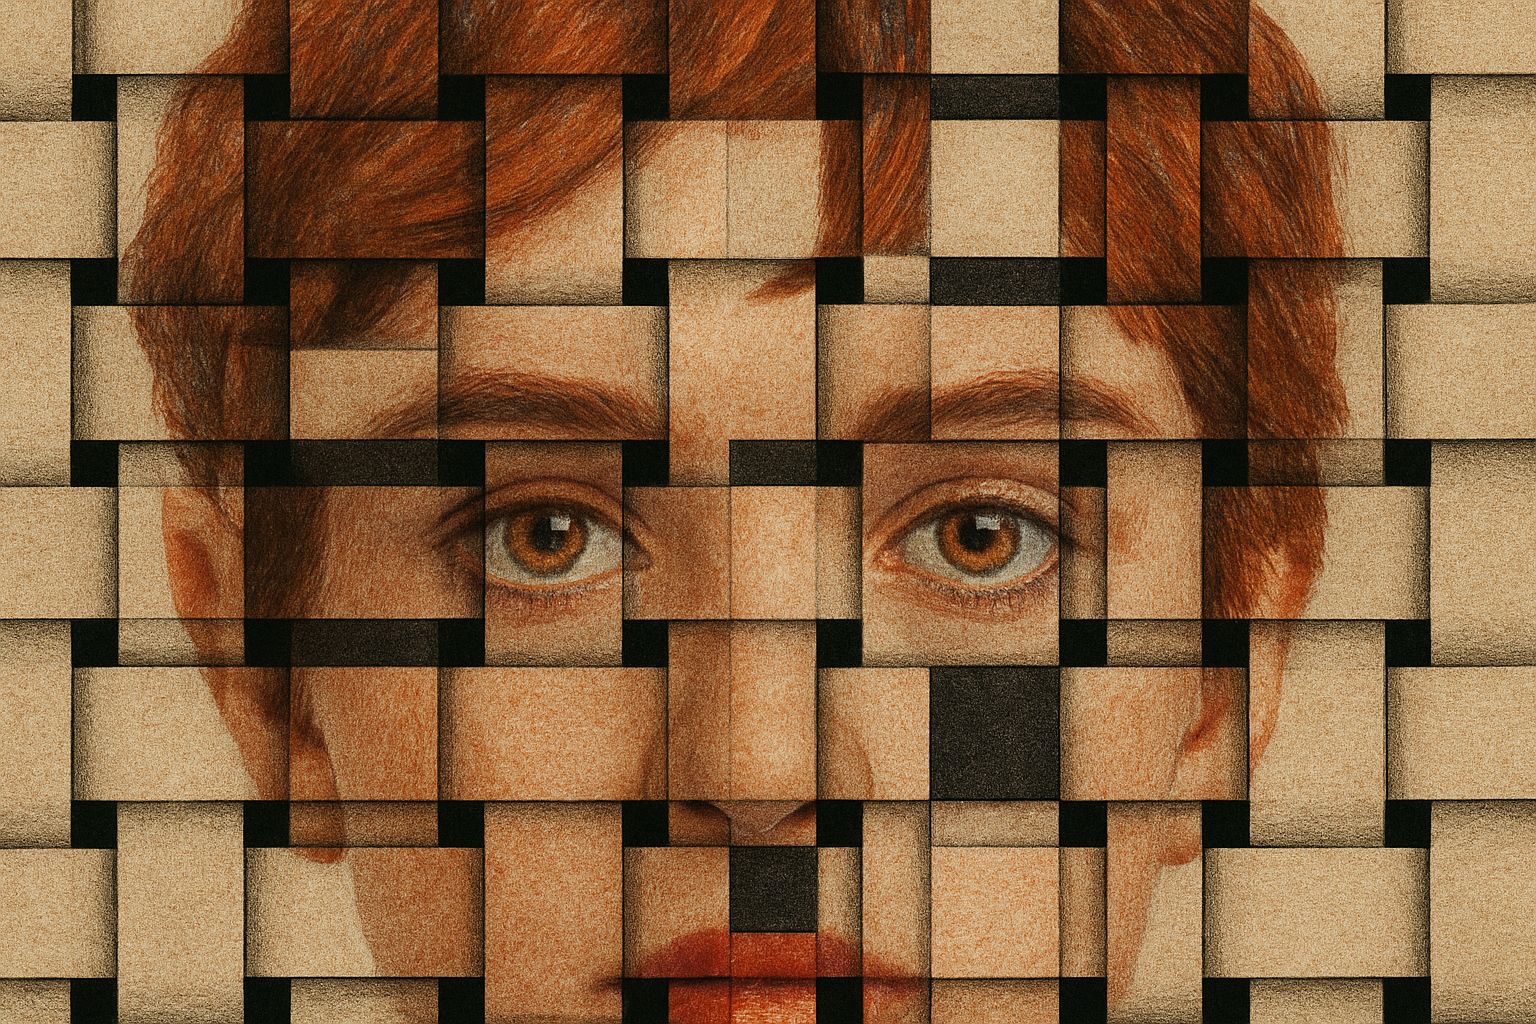
Unleash Your Creativity with a Unique Basket Weave Photo Effect
Have you ever wondered how to add a dynamic and cool texture to your photos, one that transforms a simple portrait into a captivating piece of digital art? Today, we’re diving into the magical world of Photoshop to create an interlocking basket weave effect—a method that’s perfect for closely cropped portraits and can turn your images into a visual spectacle. Sit tight, grab a snack, and let’s get weaving!
Let’s Get Started with the Basics: Cropping Your Image
When beginning the basket weave journey, the first step is prepping your canvas by cropping your image. This isn’t just any crop job; it’s about precision to fit into the basket weave effect seamlessly. Open your image, head to the crop tool, and set your dimensions to 870 pixels in width and height, with a resolution of 150 pixels per inch. Opt to delete the cropped pixels—don’t worry, this will help clean your edges and focus on the subject.
Using your trusty shortcut skills, drag the corners while holding Shift and Alt (Shift and Option on a Mac) to resize, ensuring your subject is perfectly positioned. A centered head will serve as the star of your interwoven masterpiece.
Laying the Groundwork: Duplicating and Preparing Layers
In the mystical realm of Photoshop, layer preparation is key. Create two copies of your initial layer. These copies will form the backbone of our upcoming weave. Press Ctrl (Cmd on a Mac) + J twice, and voilà, you’re duplicating like a pro. Set your ground layer by filling it with black, laying a dark backdrop for the lighter strands to pop against.
Then, configure your workspace to your liking. Navigate to Edit > Preferences > Guides, Grids & Slices, picking a bright color for grid visibility. Engineered to every 217 pixels with six divisions, this grid will guide your slices perfectly.
Carving Your Path: Selecting and Masking
It’s time to let your inner digital artist shine. Utilize the Rectangular Marquee tool, select columns and rows in a mesmerizing skip-one pattern, forming the core of your weave. By creating these selections, and converting them into layer masks, you will efficiently carve out your interlocking paths.
At this stage, don’t hesitate to toggle grid visibility (Ctrl/Cmd + H) to gauge your progress. With your top and bottom layers masked in a weaving fashion, watch the effect unravel before your eyes.
Setting the Weft and Warp: Detailing the Weave
Transform your selections into a quick mask to add detail and complexity. Using the Paint Bucket tool, fill in alternating squares across your selection for a balanced grid. Progress row by row, box by box, until you achieve the checkerboard pattern that forms your basket weave.
Switch between quick mask mode and standard selection through the magic of the Q key. With Ctrl/Cmd + J, easily cut and reposition elements to align seamlessly—a satiny stroke of genius against the stark black.
Bringing It to Life: Shading and Texturing
The magic truly begins as you add shadows, creating a 3D visual delight. Convert these selections into soft, blended shadows with the Outer Glow effect in black, set to multiply and toned down to 50% opacity. With a gentle size of 40 pixels, each shadowed edge will breathe life into your weave.
Don’t forget the finishing touch—a texture to emulate real basket material. Embrace the Filter Gallery under ‘Textureizer’ to apply that rustic burlap feel. With 100% scaling and just the right relief to capture light from the top, your photo metamorphoses into a tactile masterpiece.
Become a Photoshop wizard by experimenting and personalizing this woven wonder. While this tutorial sets you on the path to digital artistry, the true magic happens when you take the technique, add your flair, and unleash your creative beast upon the world! Whether it ends up as a profile picture or framed print, your interlocking basket weave is bound to inspire and captivate.


