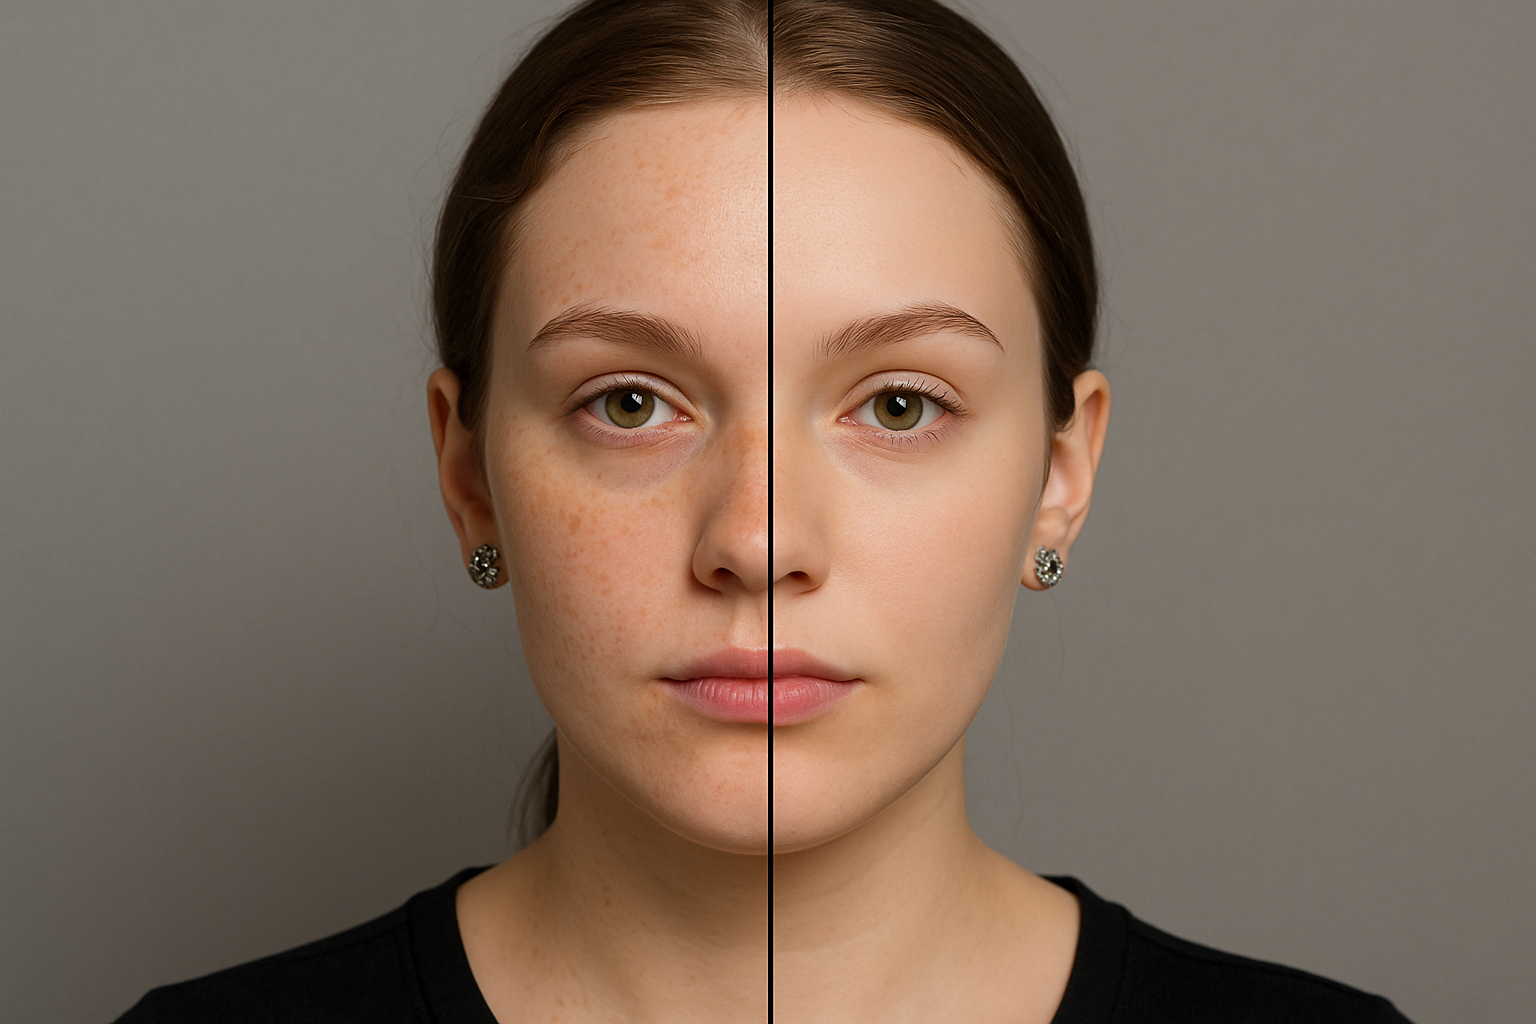
Achieving Flawless Skin: A Photoshop Retouching Guide
In the age of selfies and social media, the quest for perfect, smooth, blemish-free skin in photographs has taken on a life of its own. While skincare regimens and beauty techniques have their place, sometimes a handy tool like Photoshop can aid in perfecting that digital glow. Today, we delve into an updated tutorial that demonstrates how to achieve beautifully retouched skin in just a few steps using Adobe Photoshop. Whether you’re a seasoned designer or just wading into the realms of post-production, this guide has something for everyone.
Step 1: Opening and Selecting Your Image
First things first, choose the photo you’d like to retouch—this could be anything from a professional headshot to a casual selfie. The example used in this tutorial was downloaded from Shutterstock, a treasure trove of stock images. Once your image is open in Photoshop, the first task is making a selection of the subject’s skin. Photoshop offers various methods for this, depending on your comfort and proficiency. You can utilize the Quick Selection Tool, a favorite for many, to drag over the skin areas you want to enhance.
Step 2: Refining the Selection
After making your selection, navigate to ‘Select’ and then to ‘Refine Edge’. For those unfamiliar, the Refine Edge tool is like a precision knife, slicing out the slightest imperfections for a cleaner selection. Check ‘Smart Radius’ and nudge the radius slightly to refine the edges. This is particularly handy around tricky areas like hairlines where hair overlaps the skin. Once refined, output your selection as a new layer with a layer mask. This step ensures that any adjustments you make will be non-destructive, giving you more control and flexibility.
Step 3: Applying Surface Blur
With your new ‘skin layer’ ready, make your original image visible again and proceed to ‘Filter’, then ‘Blur’, and finally ‘Surface Blur’. The surface blur is the unsung hero of retouching. By smoothing out the skin while maintaining edges, it creates a naturally glowing effect. For the tutorial’s example image, a radius of 16 and threshold of 12 were used, though these settings can vary based on your photo’s size and resolution. Adjust until you achieve that blemish-free look without flattening the texture entirely.
Step 4: Restoring Key Features
Now, smooth skin is great, but we wouldn’t want to lose the distinctiveness of facial features like the eyes, eyebrows, or lips. This is where your layer mask comes to the rescue. With the mask active, select the Brush Tool, set its hardness to 0%, and the opacity and flow to 100%. Adjust the brush size as needed using the bracket keys on your keyboard and gently brush over areas to reveal the original, unretouched features. Consider it a balancing act; you want to emphasize those key areas without compromising the overall smoothness.
Step 5: Blurring Remaining Blemishes
If certain areas still appear grainy or the pores remain visible, the Blur Tool is your next stop. Set its strength to 100% and run it over those patches to seamlessly blend them into the rest of the face. This ensures consistent texture across all areas, something critical for a professional finish.
Step 6: Spot Healing and Adding Noise
Even with all the previous steps, you might encounter stubborn spots or blemishes. For these, the Spot Healing Brush is your ally. With ‘content-aware’ checked, adjust the size slightly larger than the blemish and give it a quick brush. It magically fills in the area with surrounding pixels, leaving the skin flawless. Finally, to match the natural grain of your photo, add some noise. Go to ‘Filter’, ‘Noise’, then ‘Add Noise’. Use a Gaussian distribution and keep it monochromatic. The amount depends on your image, but a subtle touch adds authenticity to the final product without reverting all your smoothening efforts.
Achieving a flawless, digitized look might initially seem daunting, but with these detailed steps, you’re well on your way to becoming a Photoshop retouching maestro. And while aesthetics are subjective, staying informed and skilled means you have the artistic license to choose your style. As you experiment, remember: the best retouching is often that which goes unnoticed. Until next time, keep crafting and refining your artistry!