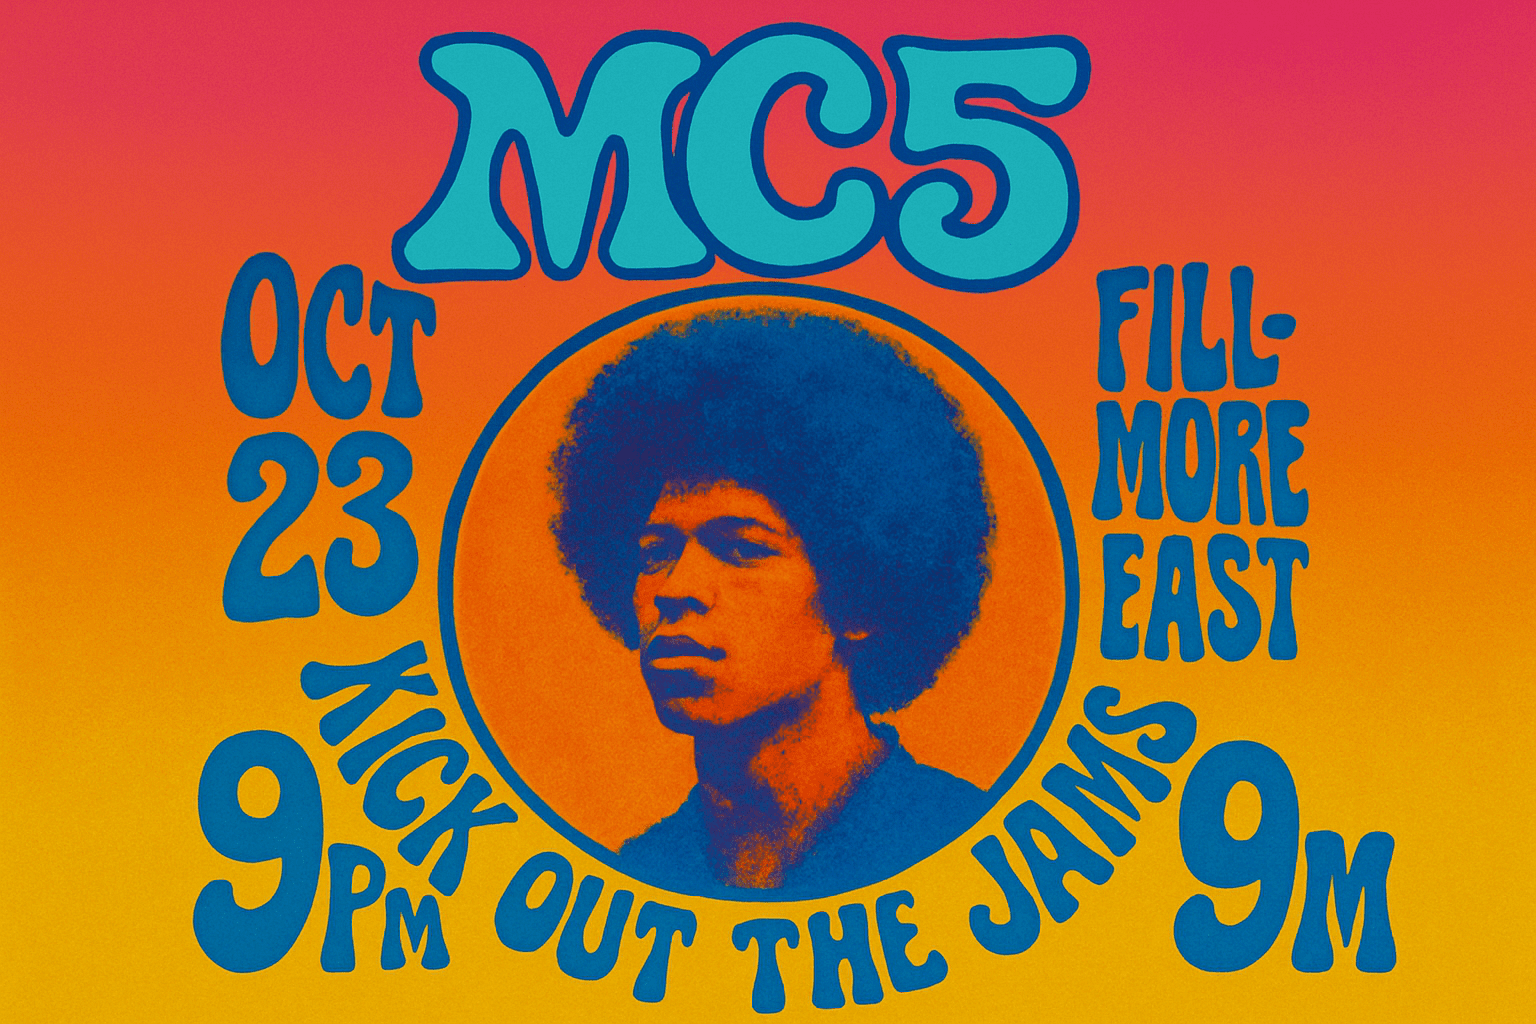
Revisiting the Psychedelic Era with Digital Artistry
Let’s take a vibrant jaunt back to the 1960s, a period renowned for its groundbreaking music and, just as memorably, its psychedelic art. The iconic music posters of that era encapsulated the electric energy of the time with their wild, swirling colors and mind-bending graphics. Thankfully, you don’t need to have lived through the ’60s to harness their style and make it your own. With the power of Photoshop and a few creative techniques, you can create your very own psychedelic masterpiece right from your digital drafting table.
Setting the Canvas: Dimensions and Background
To start your voyage into psychedelic art, the process begins on a digital canvas of 1280 by 720 pixels with a resolution of 150 pixels per inch—a perfect size for displaying your art online or printing in dazzling detail. For the backdrop, you’ll need the void black, serving as a stark contrast that intensifies the vibrancy of the neon colors you’ll later unleash. You can achieve this by using the simple shortcut Shift + F5, selecting black, and prepping your background for the visionary landscape to come.
Typography: Fonts that Groooove
Next, the typography must scream groovy! The font “Victor Moscoso” is your ticket, named after one of the era’s legendary poster creators. Set your type’s vibe with a 30-point size, crisp style, left alignment, and white color. Plant your text in the top left, but be ready to expand those letters horizon-wide using a trusty Command T on a Mac or Control T on a PC.
Psychedelic Text Layout and Liquify Effects
Psychedelia is nothing if not about fluidity and distortion—cue the Liquify tool. This is where text melds into the mystical patterns that define the psychedelic look. To form the characteristic undulating letters, use the Bloat tool within Liquify, pressing and holding at the center of your image until a swirling cosmic mass emerges.
Shape Creation: Circular Symphonies
What would a psychedelic poster be without shapes orbiting your text? Utilize the Elliptical Marquee tool to carve out a pathway for your shapes. With this shape, it’s not just about adding another design element; it’s about creating a focal point where your colors and texts rhythmically dance.
Color Gradients – The Heart of Psychedelia
Onto the pulsating heart of any ’60s poster—color gradients. The Gradient Tool in Photoshop becomes your paintbrush. Choose stunning complementary colors to conjure a vividly dynamic background. You might begin with a linear gradient, eventually exploring others as you get the feel of it. Dragging from the top to the bottom of your document will cast your spectrum across the canvas, drenched in the hues of peace and love.
The Final Flourish: Paper Texture
To lock in the authenticity, add a paper texture overlay. A few tweaks in the Filter Gallery under the Texturizer section can make your digital artwork channel that classic vintage look effortlessly. Set the scaling and relief to taste, drawing out the tangible depth of textured paper with an artistic touch.
Bringing It All Together
After stitching it all together with Photoshop’s effects and layers, adjusting Hue/Saturation becomes the final alchemy. Slide the Hue to see colors shift subtly or explode dramatically, offering your artwork a myriad of transformative possibilities.
Psychedelic art was all about pushing boundaries, and with these tools at your fingertips, you’re free to reimagine and reshape history’s luminous art form with your own modern twist. Your dayglo dreamscape awaits!
Remember, the psychedelic era was as much about the journey as it was the destination. So don’t just recreate the past—make it your own with some mindful manipulation and a dash of outrageous creativity.
Now, go forth and let your digital poster evoke peace, love, and mind-blowing array of vibrant hues. Your canvas is an open door to the extraordinary, and with each design, another trip to the utopia of the ’60s awaits.
Create, explore, and immerse yourself in the pulsating grandeur of the psychedelic 1960s. 🌈✌